How to create a theme in Magento 2
Posted on September 15, 2017 | Magento 2
In this tutorial I'll be showing you how to setup a basic Magento 2 theme. It's quite straight forward and if you have any Magento 1 experience you should follow this quite easily.
Let's get started. The following is the structure we're looking to implement:
1. Create your custom theme directory
/app/design/frontend/<vendor>/<theme>
For our example this would be /app/design/frontend/PaulDonnelly/m2theme
2. Declare your theme
Create a theme.xml file in the custom theme directory and add the snippet below.
/app/design/frontend/PaulDonnelly/m2theme/theme.xml
<theme xmlns:xsi="http://www.w3.org/2001/XMLSchema-instance" xsi:nonamespaceschemalocation="urn:magento:framework:Config/etc/theme.xsd">
    <title>m2theme</title>
    <parent>Magento/Luma</parent>
    <media>
        <preview_image>media/m2theme-image.jpg</preview_image>
    </media>
</theme>
<title> is where you would put the name of your theme. For this example, we'll use m2theme.
<parent> is where you would put your parent/fallback theme. It should be formatted like this Vendor/Theme. You can choose the Blank Magento theme or the Luma theme. For this example, we'll use Luma as our base theme so we enter Magento/Luma.
<media><preview_image> is where we add an admin preview image, simple put your preview path as media/m2theme-image.jpg or whatever your filename is. This image should be 800 x 800.
3. Create a composer file
This file is optional and only really required for module & theme developers. I want this article to be as straight forward as possible so we'll not dive into composer right now since it's not required.
4. Register your theme with Magento
Create a registration.php file in the custom theme directory and add the snippet below.
/app/design/frontend/PaulDonnelly/m2theme/registration.php
<?php
\Magento\Framework\Component\ComponentRegistrar::register(
\Magento\Framework\Component\ComponentRegistrar::THEME, 'frontend/PaulDonnelly/m2theme', __DIR__
);
In this file make sure you change the Vendor and Theme names. In this example, it's PaulDonnelly and m2theme
5. Create your theme static file folders
The following folders need to be created in the main theme directory to store your additional theme css/fonts/images/js files.
/app/design/frontend/PaulDonnelly/m2theme/web
/app/design/frontend/PaulDonnelly/m2theme/web/css
/app/design/frontend/PaulDonnelly/m2theme/web/fonts
/app/design/frontend/PaulDonnelly/m2theme/web/images
/app/design/frontend/PaulDonnelly/m2theme/web/js
6. Create a view.xml configuration file
This file is used to configure the theme image sizes (amongst other things). It's an optional file if the parent theme has one. As an example of one in action, you can add this to the view.xml which is to be located in etc/view.xml within the theme folder.
/app/design/frontend/PaulDonnelly/m2theme/Magento_Theme/etc/view.xml
<?xml version="1.0"?>
<view xmlns:xsi="http://www.w3.org/2001/XMLSchema-instance" xsi:nonamespaceschemalocation="urn:magento:framework:Config/etc/view.xsd">
    <media>
        <images module="Magento_Catalog">
            < image id="category_page_grid" type="small_image">
                <width>240</width>
                <height>300</height>
            < /image>
            < image id="category_page_list" type="small_image">
                <width>240</width>
                <height>300</height>
            < /image>
        </images>
    </media>
</view>
By reading this code you can probably tell what it is doing but if you don't understand it, it's basically resizing the category grid images and the category list images.
At this stage your module is good to go, but lets go a little further to show you how to modify the theme.
7. Change the Theme logo.
Create a folder called Magento_Theme with a sub folder called layout in the theme directory and add a file called default.xml
/app/design/frontend/PaulDonnelly/m2theme/Magento_Theme/layout/default.xml
Add the following code to change the theme logo.
<page xmlns:xsi="http://www.w3.org/2001/XMLSchema-instance" xsi:nonamespaceschemalocation="urn:magento:framework:View/Layout/etc/page_configuration.xsd">
    <referenceblock name="logo">
    <arguments>
    <argument name="logo_file" xsi:type="string">images/pauldonnelly.png</argument>
    <argument name="logo_img_width" xsi:type="number">229</argument>
    <argument name="logo_img_height" xsi:type="number">33</argument>
    </arguments>
    </referenceblock>
</page>
The code above is simply redeclaring the logo block and changing the image url to images/pauldonnelly.png. The arguments for width and height are optional but it's good to add them. The image pauldonnelly.png needs to be placed in the web/images folder in our theme.
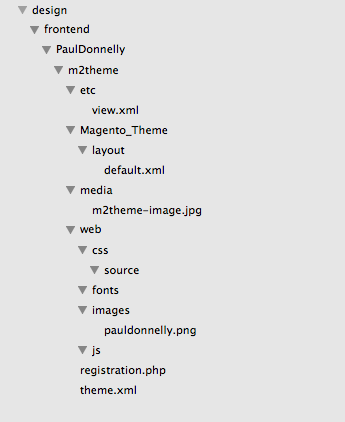
This is the final structure you should have for your custom theme:
8. Apply your theme
To apply your theme, log into your admin panel.
Go to Content/Design Tab/Configuration
Click Edit with the row with your Default Store View (usually the third row)
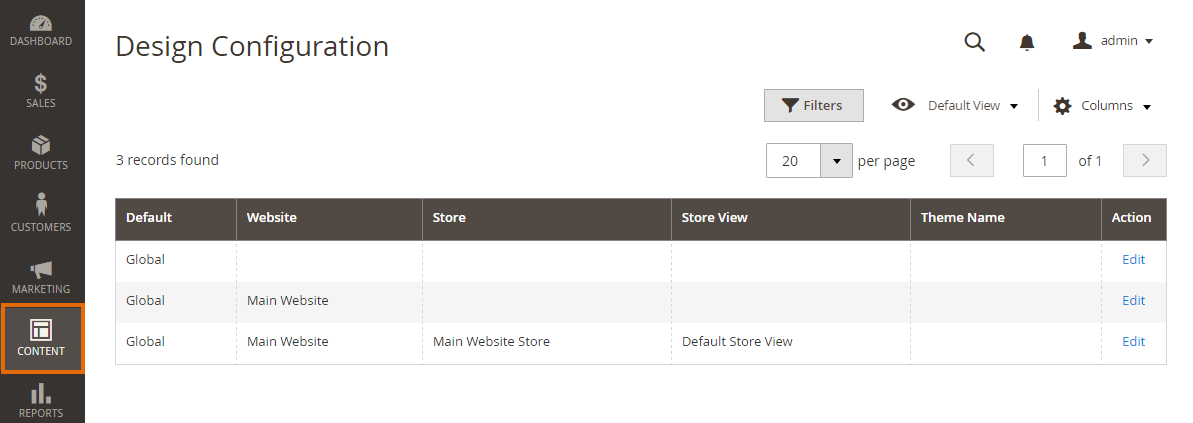
In the Design Theme dropdown, select our new theme called m2theme or whatever you have called it. Click Save Configuration & Clear your Magento Cache.
That's it, your new theme should be applied and the new logo should appear.
I hope this is a good starting point for you.
Updated: 21/09/2017
I found this video very helpful when trying to understand Magento 2 frontend developer workflow.